This page was originally hosted at http://www.q-ice.com and was reuploaded from the Internet Archive with permission from the author Tsukushisanari (Twitter: @sanarium) Some links are fixed and there are other corrections and additions. Some notes from the rehoster have also been added.
There have also been some changes to the CSS, and you can toggle between the previous one and the new one with the buttons below.
Hellsinker. is a shmup that requires a lot of strategy.
Sadly, due to its eccentric design and mechanics, it's very hard to get into, and there are a lot of people that avoid it or get lost halfway through.
Even the manual blocks the player's path, said to be the secret final boss, written in "Hiranyonese".
Of course, it would really be a shame for such a masterpiece to remain buried, which is why I wrote this manual.
This guide's purpose is to help in understanding Hellsinker itself and its own instruction manual.
The philosophy of this guide is to cut all that information into the absolute minimum so you can form a criteria to think about the game, and as such, it is not a strategy guide.
"Hiranyonese" because Hiranyon is one of the names Hellsinker's developer has gone by.
Formatting
At some points there will be some information inside colored frames.
Each color represents a different type of information.
Grey frames are particularly important, and they could be a summary of the preceeding text. These are the bare minimum you should read.
White dotted-line frames are supplementary information to help comprehension, and they are generally not that important.
Green frames contain information removed from the main text in order to aid comprehension. You can read them to gain a higher level of understanding, but beginners may skip them altogether.
These pink frames are translation notes and comments which weren't part of the original guide, and provide some explanations or trivia about the Japanese in this guide or terms from Hellsinker itself.
PS: For any suggestions about this version of the guide, message 730#8471 on Discord.
Hellsinker is often described as hard to understand or complex, but its difficulty as a shmup is actually very easy.
It's such a peculiar game that comparing it with other shmups wouldn't make much sense,
but I'm assuming most people reading this site have played Touhou, so I'm going to use it as an example:
You can beat Hellsinker no problem if you have enough skill to beat Mountain of Faith on Easy or to reach Stage 3 or 4 on Normal.
However, it's not a game you can clear by simply flying around and shooting with your ship.
Whereas Touhou is a game about skill, Hellsinker is a game about strategy.
The most recognizable feature from the Touhou series are the Spellcard bullet patterns.
Their beautiful geometric shapes and the characters' traits which their forms and titles represent have made them very popular.
The player must figure out how to dodge and overcome these bullet patterns.
The display of these bullet patterns is one of Touhou's main themes, so there's no way to completely avoid these altogether,
and there's even some that don't allow you to damage the boss until the pattern has formed to a certain degree.
On the other hand, on Hellsinker there's the following ways to deal with an enemy's attacks or bullets:
-Simply dodge them
-Erase the bullets themselves
-Stop the enemy from shooting
-Destroy the enemy before it shoots
-Stop the enemy from appearing altogether
-Skip the whole route in which it appears
Thinking and planning how to deal with each incoming attack is one of the things that makes Hellsinker really special.
Of course, there are a lot of things to keep in mind if you want to come up with these strategies.
You have to learn what the ships are capable of doing, what differentiates each enemy and each of their attack patterns, and how to deal with bullets.
Once you've learned these things, though, the need for training by trial-and-error will disappear almost entirely.
Once you've learned how to approach a certain attack, you won't need a high amount of skill to execute your strategy, and you can even execute it without having seen this attack in-game before.
Here's an example:
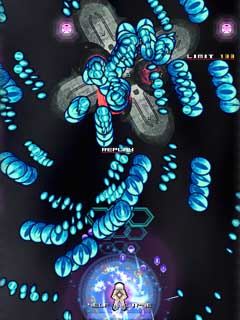
This is during Stage 2. If you just stay in the bottom middle of the screen, enemy formations will come one after another and shoot a large amount of bullets at you at high speeds.
You end up not being able to dodge, and die.
But, if you're aware of the incoming enemies beforehand,
you can set yourself up in the upper part of the screen
and get through it without shooting a single bullet nor moving an inch.
You could say this game is about thinking how to make these harsh enemy attacks milder.
Even if you don't worry about scoring, you can get up to 10 or even 20 1UPs in a full run.
There's certainly a lot to remember, but once you do, it will look to other people like you're a pro elegantly dodging hundreds of bullets.
This game is a puzzle, and you'll have to think hard about how to solve it.
■Recommended to these kinds of people
-People who like shmups but their reflexes aren't good enough
-People who don't mind using their head
-People who don't play shmups at all but are interested in them
-People who need their shmups to have giant mech bosses and destructible parts
-People who would take one of these games to their grave:
Metal Black, Rayforce series, Darius series, Battle Garegga, Radiant Silvergun, etc...
The purpose of this site is to help comprehend Hellsinker, which is a pretty difficult task.
Therefore, I might dismiss things that I deem obtrusive for comprehension, saying they're "not necessary" or that you "don't need to look at them", following the philosophy of "cut all the information into the absolute minimum so you can form a criteria to think about the game".
Of course, this dismissed content and features will be necessary to you in the future, so take that in mind.
Something interesting I'd like to note is how enemies are called in this game.
Normally, enemies in shmups or games in general are called 敵 (which does mean "enemy"), pronounced "teki", and you can, for example, combine this character with the character for bullet (弾) to make the word for "enemy bullet(s)", pronounced "tekidan".
In Hellsinker, every such instance of 敵 is replaced with 的, a character that can mean "target" (as in a target at shooting practice, for example), generally pronounced "mato" as a standalone word, but one of its possible pronunciations also being "teki".
Hellsinker is controlled with 8 directions + 3 buttons.
The buttons have the following names: -Main shot (MS)
-Subweapon (SW)
-Discharge (DC)
Since reading MS or SW in the middle of explanations might be confusing, I'll represent them like this:
The A Button is the Shot button. All of the characters will shoot bullets when this button is pressed.
There are many ways to use it, such as holding it for charge attacks, pressing it twice quickly, pressing it along with another button, etc.
It is without a doubt the button you will be pressing the most.
The B Button is the Subweapon button, the second attack button.
This button best represents each of the ships' unique functions.
Mastering this button is key to amplifying the range of possible strategies you can utilize.
The C Button is the Bomb button. It will execute a powerful attack while also making you invincible when pressed.
It's better if you don't think of it as an emergency evasion button as it is in "normal" shmups.
It does make you invincible so you could use it for this purpose, but its use as simply your most powerful attack holds precedence.
The bomb gauge is constantly charging up, so not using it is a waste.
Beginners tend to use it as soon as it's fully charged, so in that case you don't need to worry.
There are many cases where invincibility doesn't activate as soon as it's pressed, so if you tend to use bombs right before getting hit you should take care in that regard.
There are some that feel like Battle Garegga's Special Weapons.
There's also a 4th button, the Slow button,
but adding one more button may cause confusion, and there's even some ships that have no slow function and the button is assigned another function instead;
coupled with the Slow feature not being that important to begin with, you may ignore it.
I recommend using a gamepad for this game.
I can't recommend just using your right thumb for the buttons though.
You'll have to press multiple buttons simultaneously extremely often, and this can go from pressing A+B to something complex like "while pressing A+B, hold C, and then hit A repeatedly, then go back to just A+B".
You should come up with your own clever way of using one, such as using all 5 fingers for each button, or making use of the triggers/bumpers in something like a DualShock.
You can configure the gamepad bindings with "HS_padas.exe" inside the Hellsinker folder.
There's a lot of options, but as long as you got A, B, and C configured then the others wont't matter much.
Configure buttons through HS_padas.exe. (in the booth and Steam versions it opens when launching the game. You can configure buttons by clicking "Pad assign")
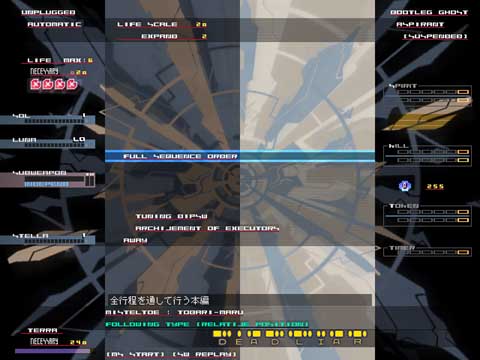
After launching the game and going through the mysterious Name Entry, you reach the Main Menu.
At first, everything might look like a mess and you might have no idea where anything is,
but you just need to look at the menu cursor in the middle and the text at the bottom.
From the top: -Start game
-Settings
-Scores
-Quit
You don't really need to fiddle with the settings, but I recommend setting the one that says "EXECUTOR DEATH AREA" to SHOW.
The proper name of this option on the menu is CORE SIGN, and (at least on the Steam version) it's the 3rd option in the Video settings menu.
The translation "EXECUTOR DEATH AREA" might be confusing, but what this does is simply make your own hitbox visible.
What is important is how to select your character.
If you press left or right in the menu screen, the yellow letters at the bottom will change, which means you're selecting a character.
Normally, after choosing what you're going to do (play the game, watch a replay, etc.) you choose your character at the end,
but in Hellsinker you choose character first and go into the other modes afterwards.
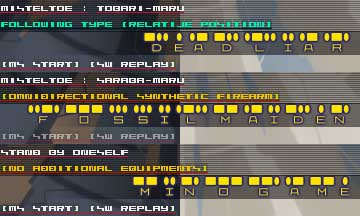
For example, if you want to watch a replay done with Minogame, you first need to choose Minogame, and then go into the Replays screen.
You go to the Replays screen by pressing B after choosing a character. This might have been confusing whenever you wanted to go back to the previous menu, only to press B and end up on the Replays screen.
On the Menu screen: Choose options with Up/Down
Choose character with Left/Right
Confirm with A
Replays with B
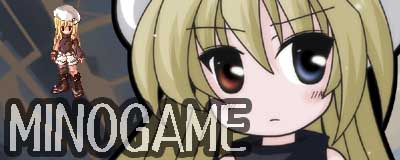
Now you can finally choose your character, but you should really just use Minogame.
Even if there's another character you want to use, I recommend using Minogame until you get used to the game.
The reasons I recommend Minogame are the following: -No-risk invulnerability moves. Combined with the bomb, you can stay invincible for quite a long period of time
-Due to this invincibility, you can brute force your way through the game to some degree
-Not many things to do or pay attention to, so even beginners will have more freedom, and you'll be able to make use of this freedom to observe your surroundings
-You won't have to focus as much on the enemies, so you'll learn the mechanics quicker
What we'll focus on here is the understanding of the game mechanics. Character intricacies will come later on.
For this reason, getting used to the game's feel by using Minogame, who has relatively little going on and allows you to advance safely, is a priority.
Once you understand the game to some level, and are able to stand on your own, you'll be able to truly choose your character once again.
This is like going to driving lessons and doing a road test while following the course, and learning about the different signs and situations that may come up.
After those lessons, you may just keep using the same car if you liked it, or change to another one you like better.
Just use Minogame.
Boot up the game, enter the menu screen, and use Left/Right so Minogame's name appears at the bottom of the screen.
Choose the first option and start the game.
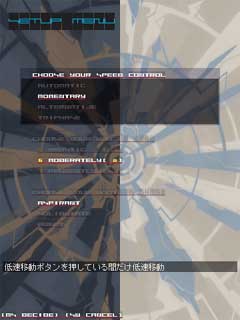
Before starting, the Setup menu opens up.
The first option above is the Slow setting.
You should set it so you only Slow while the button is pressed.
The option for slowing when you hold down Shot might look good at first,
but with Minogame you're always holding A (explained later) so it doesn't work out very well.
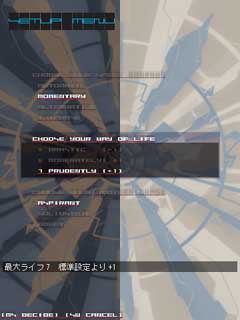
The option in the middle is the Life setting
You should definitely choose the one that gives you +1.
Making this one easier isn't going to bring you any important disadvantages.
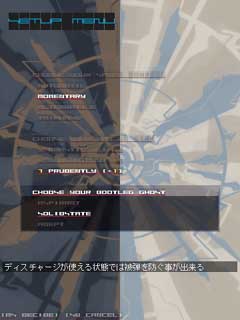
The last option is the Defense option.
Here you have to choose the one in the middle, SOLIDSTATE.
This will make it so if you get hit while being able to fire a bomb you don't receive any damage, so it's basically autobomb.
This can only be used 3 times per stage, but you won't die while still holding a bomb, so this is practically the same as having 3 extra lives, therefore, you have no reason not to choose it.
You'll use 3 moves with Minogame. Yes, just three. Though if you feel like it, you might add one more to that.
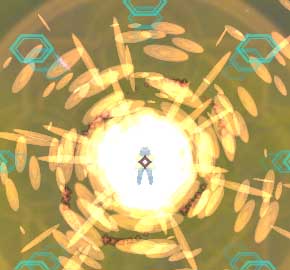
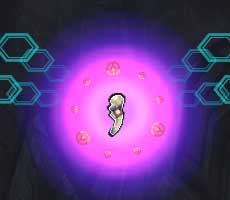
●Nimbus Cluster YB [Nirvana] ☆Press B while holding A and the subweapon gauge is at MAX
Nickname: Nirvana
Simply put, press B after having held A for long enough.
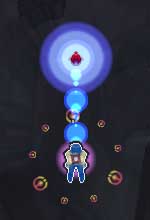
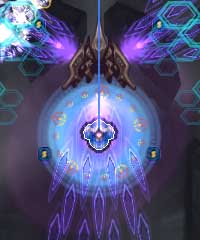
Minogame's greatest and strongest weapon. Deploys a big white circle before you. This circle has a hitbox and while you're inside you're completely invincible.
The circle disappears in about 2 seconds. This also means you have an absolute safety zone for 2 seconds.
●Forbidden Shell ☆Hold A and release
Nickname: Shell
Minogame's main firepower. Deal close-range damage while covered in a pink light. It grinds down whatever it touches bit by bit.
Since it's a physical attack it might be scary to use it by itself and not seem very useful, but when combined with Nirvana it transforms into a very easy to use move.
●Azure Lotus ☆C
Bomb.
Powerful hitboxes cover the whole screen with you at the center.
It remains active for quite a long time so it's pretty easy to use. While bombing you can do other things such as move or attack, so when combined with Shell you can expect some serious firepower.
When you're feeling more adventurous:
●Reality Hedge RT [Naraka] ☆Press B when the subweapon gauge is at MAX
Nickname: Naraka
Homing beams that are kind of like Ikaruga's (black) power release. Not only does it do high damage, but also stays for a long time grinding down enemies, making it very powerful.
Its input overlaps with Nirvana, which is Minogame's main method of defense, and as such you can only use one of each at a time, thus, I recommend using it with due precision only when it's time to attack.
Using Minogame basically comes down to holding A down the whole time.
If you want to attack or defend (for example, if a group of enemies are shooting a lot of bullets, or there are enemies you want to kill, or they're blocking your way, etc.), press B while still holding A.
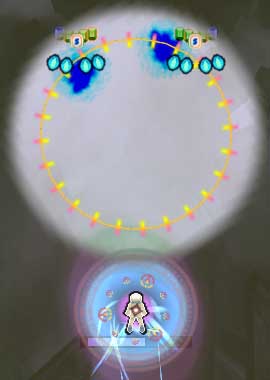
Nirvana will activate, and its white circle will appear in front of you, so jump inside it without hesitation.
While in the white circle, you'll be completely invincible. Neither bullets nor enemies will be able to hit you.
If you approach an enemy you want to kill while inside Nirvana, release A for a moment, then Forbidden Shell will activate and attack.
Your main damage source will be this combined close-range attack done while utilizing invincibility.
It's a "shoot 'em up", but you're gonna keep ramming into enemies without firing any bullets,
so I believe you realize by now how this game distinguishes itself from other shmups.
When Nirvana is about to run out, you can draw back and wait for your subweapon gauge to charge, or you can bomb and combo into more invincibility.
You should be holding A down the whole time while doing this, so as to charge the next Forbidden Shell.
When the bomb is about to run out, use Nirvana again.
Release A inside the white circle and activate Shell.
This way, we can do an invincibility->invincibility->invincibility combo.
Get into the habit of using bomb whenever Nirvana isn't going to make it or when you think you're in danger.
The gauge for the bomb refills by itself anyways, and you'll be able to use it again right away, so there's no point to keeping it.
You'll only be using Nirvana, Shell, and Bomb.
If you think that's not enough, then you can also use Naraka.
It's activated by pressing B when the subweapon gauge is at MAX.
Since you're constantly holding A,
you're going to have to let go for a moment then press B, and then go back to holding A again.
This way, when the subweapon gauge is full, you'll have the two choices of Nirvana and Naraka.
Subweapon gauge MAX
|
|->In danger->Press B (Nirvana)
|
|->Not much to worry about->Release A and press B (Naraka)
If you press A repeatedly you can use the normal Main Shot,
but you must not use this.
The main shot's power is low, and if you use it your subweapon gauge decreases.
It wouldn't be much of a problem if it simply was weak, but it also doesn't let you use Nirvana, which is your safety net.
Also, using your subweapon when the gauge is not at MAX is not recommended.
Having said that, you'll have a hard time beating the game without utilizing the full repertoire of your abilities.
The final boss might also be pretty much impossible without using the main shot.
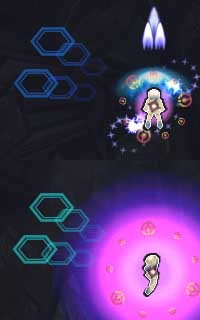
In the last part, "Subweapon Gauge" comes up a lot, and now I'm going to talk about these gauges.
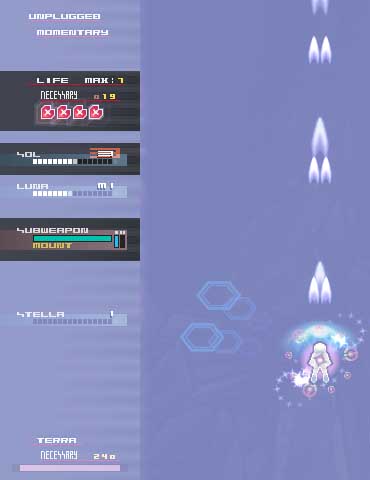
The minimum you should remember are these 3 gauges on the left side.
From the top, "LIFE", "SOL", and "SUBWEAPON".
Like its name indicates, LIFE shows the number of lives you have.
If you lose all the hearts here, it's game over.
There's a lot of numbers here but you shouldn't mind them.
The LIFE gauge is just something you're going to check every once in a while during the game to see how much is left,
so there's no need to pay attention to it frequently.
SOL is the bomb gauge.
It actually also correlates with the power of your main shot, which is pretty important,
but Minogame doesn't use main shot, so just think of it as the bomb gauge.
It's represented with the numbers 1 through 5 and it raises over time. If it's at 3 or more, you can bomb.
This is why you should always be paying attention to it and use a bomb whenever the gauge reaches 3...
Which is what I'd like to say, but you can't constantly be paying attention to the gauges at the side in the middle of the game.
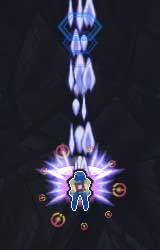
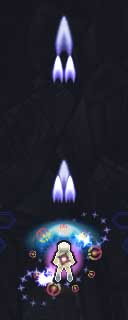
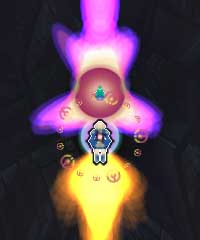
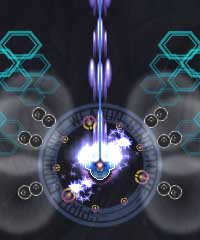
You can actually check the status of your SOL by the effect around of your ship.
There's these orange circles around the ship.
The big circles represent the value of your SOL (there's no effect when it's at 1 or 2).
So when this effect appears, it means you can bomb.
Also, when the gauge gets to 3 or above, that is, when you can bomb, a female voice (?) sound effect will play.
The voice file is in the Hellsinker folder at "wav/discharges.wav".
I have no idea what she's saying, I can only hear it as "SYSTEM OKAIDOKU".
If you make use of the effect around the ship or the voice to know when you can bomb, you won't need to check the SOL gauge.
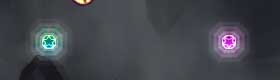
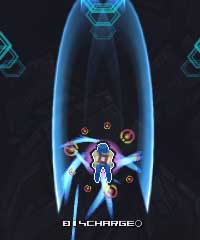
The next thing to learn about is the SUBWEAPON gauge.
It appeared rather frequently in the last part.
This gauge is really important in order to use Nirvana, which gives you invincibility,
and you can also check its status within the main game screen itself.
There will be a lockon sight to the front when you can shoot Nirvana (while holding A) and to the sides when you can shoot Naraka (while not holding A).
These don't really show where the attacks will land, but rather the direction they'll fire towards.
It looks blue when it's not full yet, and green when it's at MAX.
When the subweapon gauge fills up other voices play.
The file for the first level of charge is subok1.wav, and the one for the second level of charge (MAX) is subok2.wav.
You can guide yourself by the guy's voice saying "SUPERCHARGED".
There's no need right now to learn about the other gauges, you can do so gradually whenever it becomes necessary.
The gauges at the right all have to do with scoring, so if all you want is to clear the game, you don't have to worry about them.
You actually don't need to remember the gauges at the sides.
(tonnyori) i think it was "OverCharged" but wtev who cares
(Iceshop) oh rly
(Iceshop) aight then... i guess
(tonnyori) actually the OKAIDOKU thing is "Discharge is available", but yea whatever
"okaidoku" is a word that means getting good value out of a purchase, i.e. quality or quantity that is worth the price of the product.
Not something especially relevant to Hellsinker at all, but thought I'd explain.
By the way, the above seems to be a chat excerpt between tonnyori (the developer) and Iceshop (the original author of this guide).
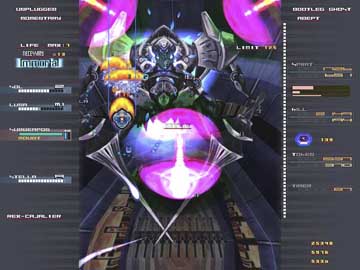
When you first play the game, you might get really confused by the sheer amount of information and objects within the main game screen.
You might understand which are the enemies and which are their bullets, but the problem is all the items that come out of them.
You might wonder which ones you should pick up, but you can actually ignore them entirely.
Of course, they each have their own effects, but since there are no power-ups in this game,
they won't have that much of a use for a beginner, and it's very possible that you'll promptly die by trying to pick them up.
I could just tell you that you don't need any of them, but there's some that you should definitely pick up if you can.
●Life Chip icon
A heart with an L in it. Very easy to understand, and I assume you can guess what its effect is.
If you get a lot of these, you'll get a 1UP.
More specifically, you'll get a 1UP if you gather an amount of Life Chips equal to the number shown next to "necessary" on the LIFE gauge.
You should consider this item top priority.
●SOL icon
Increases SOL. That is, it recovers a bit of your bomb gauge.
At the end of the first stage a lot of enemies start coming out really fast, but they all drop SOL icons,
so you can Bomb->get SOL->Bomb again, and so on.
You generally don't need to worry about them, but there might be parts where they'll save your skin.
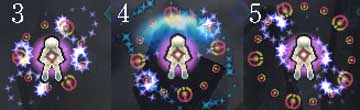
Sometimes you'll see these items come down lined up together.
The green ones increase difficulty, while the red ones lower it.
Beginners should prioritize getting the red ones, making everything much easier... probably.
It's not like getting the green ones will instantly increase rank at once, so there's no need to get paranoid.
Their main use is to fix enemy/bullet patterns by fixing the difficulty, therefore there might be some times in the future when they'll be helpful.
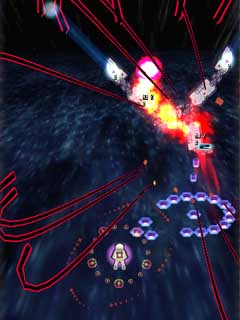
There's also these round items that spread out in big quantities when you die.
In normal shmups these would be power-ups that help you get back to how you were before,
but in this game, they're the rank you've lost after dying, helping you rise it back up to how it was before death.
For beginners, they are nothing but harmful. You should probably not take them.
These also help fix patterns by restoring the difficulty you had before dying.
-You don't have to go out of your way to pick up items.
-But you should definitely get Life Chips
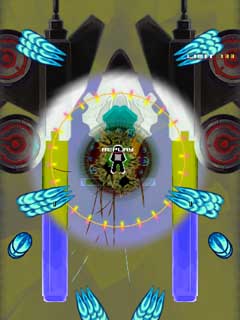
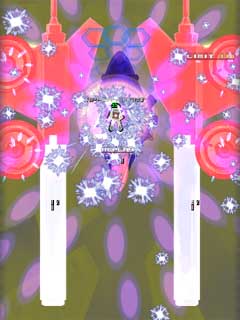
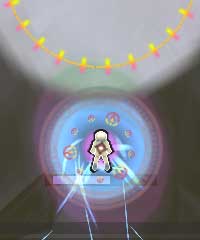
●Supression Radius
This is one of the most prominent features of this game, and also one of the main reasons the player is able to survive in the middle of all the bullets trying to kill them.
Supression Radius activates when you're not repeatedly pressing A.
With Minogame (road test), since you're always holding A, Supression Radius will always be active.
Supression Radius is a blue-greyish aura surrounding the ship,
and it can slow down enemy bullets and erase them.
This means that even if you get cornered by bullets that you don't think you can dodge, you won't need to slip through narrow spaces,
but rather just approach them and erase them.
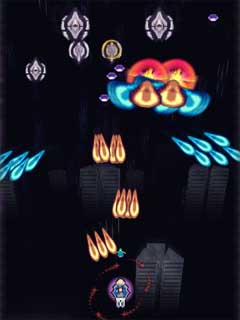
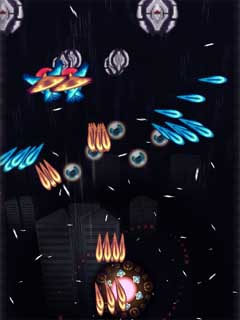
Even with harsh bullets like these...
...you can approach them face on and erase them.
With Minogame, you can just use Nirvana and combine it with this ability,
but other characters don't have Nirvana, so take that in mind.
This ability might seem all-powerful at first, but the difficulty with which you can erase bullets will vary depending on their shape.
Generally speaking, you can erase the round ones but not the pointed ones.
You should particularly pay attention to the droplet-shaped ones. They might look round at first, but the other side is sharp.
Not only can you not erase them, but they're also quite fast, so if you approach them face on you'll end up dying spectacularly.
The bullet's size correlates to the time it takes to erase it.
Small round bullets will be erased almost instantly, but big round ones will make you think you can erase them, while you end up going head on and they reach you before they get erased, so take care.
Additionally, slowing down bullets will not always be advantageous.
Sometimes you might lose the spaces between bullets by slowing them down, and you end up having nowhere to escape.
Just like you can't be constantly shooting, you also have to think when and where to use Supression Radius.
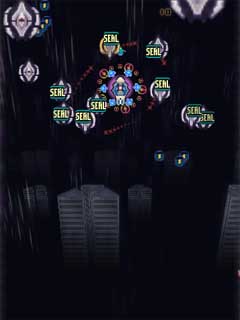
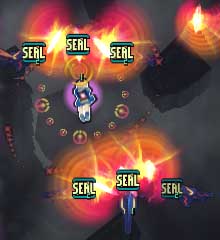
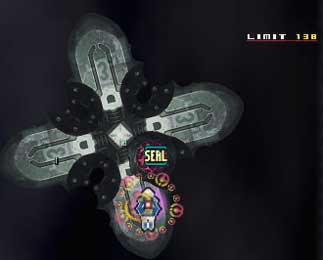
●SEAL
I touched upon this a bit on the first part. SEAL is an ability that all ships share.
When you approach enemies, the SEAL symbol will appear on their gun/s,
and as long as you don't separate from them, that/those gun/s will never shoot any bullets and remain sealed.
Naturally, there are some attacks you can't SEAL, but you can actually SEAL almost all bosses' attacks,
making a lot of parts in the game extremely easy.
Thanks to SEAL and Supression Radius, you're able to go forwards and face enemies head on.
This means that for each risk, there is an equivalent reward.
You can erase enemy bullets with Supression Radius.
For difficult bullets use SEAL. This carries a risk, but the reward is considerable.
In order to fulfill an objective, it is always important to break it down into smaller objectives.
This is an example for a list of objectives:
1. Clear Stage 2 with Minogame (road test)
2. Properly choose a character
3. Clear Stage 4
4. Unlocked KAGURA, so choose character again
5. Clear Stage 5
6. Think about when to use the Continue and when to make the Shrine appear
7. Get to the last stage
8. Clear the last stage
9. Rest omitted
Stage 1 and 2 are actually more of a tutorial, where you can try out the characters and mechanics, so let's use them to review what we've seen so far.
The attacks from Stage 1 might look brutal at first,
but if you make use of your ship's abilities and the game's mechanics properly, you'll see that it's much easier than any first stage from an average shmup.
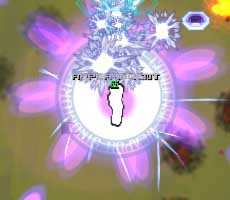
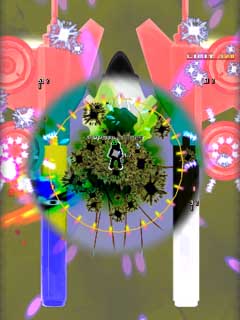
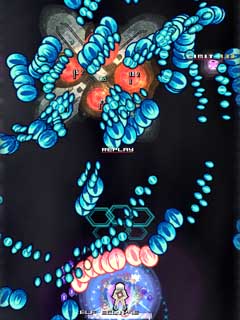
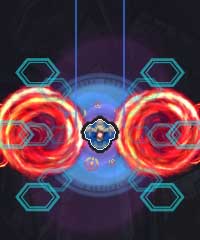
Stage 2's boss is quite tough. As you destroy the 4 cores, new cores appear, generating even harder attacks.
It might seem like it regenerates forever, but it does have an end, so keep at it.
There's actually a certain thing you can do to bypass it with little difficulty.
Hint: SEAL works against the second cores.
By the time you can clear Stage 2, you've probably gotten used to the game,
so you should choose the true character you're going to use.
If you like Minogame's invincibility you might as well keep using it,
though if you want some more firepower you can go with DEAD LIAR (nickname: Akihiro),
or if you want a good variety of weapons, you can choose FOSSIL MAIDEN (nickname: Maiden).
There's one more (which is actually 4 characters in one), but it won't be unlocked until you clear Stage 4.
Once you clear Stage 4, you unlock Stage Select for practicing and a new ship, KAGURA.
With KAGURA selected in the menu, each time you press Pause its name will change, with 4 different selectable armaments.
They're Chirijinmu, Gousetsu, Himawari, and Omiwatari, and none of them are straightforward.
In the English-speaking part of the Internet, people seem to call KAGURA variations by their weapon names (MOON CRADLE, ELLIPTIC CHARIOT, INFERNAL SABBATH, and XANTHEZ), but personally, I think their proper Japanese names are much shorter, catchier, and easier to remember.
Each equipment seems to have another name (GROOM EATER, PAIN KILLER, PROMISED DAWN, and NO CHASER), though I don't know what the difference between these and the previous 4 is supposed to be.
Additionally, KAGURA's names originate from certain enemy names in Radio Zonde (a previous game by the same developer), where they were written in very unorthodox romaji along with kanji. They seem to be based on the names of certain weather/natural phenomena, but they're written in different kanji than the words they're based from (thanks to the host of this site for providing additional interpretations on the names and Radio Zonde info!)
Now, let's talk about Continue and the Shrine.
You can use 1 Continue in this game.
Additionally, after clearing Stage 4, a stage called Shrine of Farewell will start to suddenly appear.
It's like a bonus stage, and it will appear once the TERRA gauge at the bottom left reaches 0.
It will allow you to get extra lives with certainty, but you won't be able to use Continue anymore.
Deciding where to use Continue and where to make the Sanctuary appear is important for clearing the game.
This depends on the player's skill and strategy, so make sure to try many things out.
Once you've gotten used to the mechanics, it's time to really decide what character you're going to use.
The controls and strategies completely differ from character to character,
so instead of using a lot of different characters, I recommend narrowing it down to a single one.
■DEAD LIAR
Nickname: Akihiro (it's his real name)
An orthodox ship with a regular shot and a regular bomb.
His main shot and his charge attack blade both deal heavy damage.
Since you can set his Subweapon down wherever you want, it might look like he has no downsides, but he doesn't have many defensive options, so he's recommended for experienced players.
His attack range is also narrow, requiring careful planning.
If you don't do well, things will turn sour quickly, but if you perform properly, you'll have some serious attack power under your control.
■FOSSIL MAIDEN
She specializes in having many different forms of attack, such as her main shot which can shoot in 8 directions, a powerful Option, a laser that destroys bullets, 2 different bombs, a lance that can quickly grind enemies down, etc.
Given you need to utilize all of them to their full extent, you might have a hard time knowing when to use which.
Once you learn her, she can do anything from long-range sniping to close-range attacks, a true jack of all trades.
Whether she becomes a master of none of them or a super-heroine is up to the player.
Maybe because she's supposed to be sickly, the radius of her Supression is small, and it's hard to obtain 1UPs with her.
"Option" is a term in shmups that refers to little ships/familiars that follow you.
In Hellsinker they're generally called "Mistletoes", and tend to be pretty unconventional (not all Options are Mistletoes though; read the manual for more information).
PS: The manual and the game spell it as "MISTELTOE", but I'm assuming this is just a misspelling due to English-Japanese conversion shenanigans.
■MINOGAME
A heterochromiac androgynous Sokushinbutsu focusing on defense.
Just as explained several times before, they have a powerful invincibility->invincibility->invincibility combo.
In exchange, their general firepower is low, especially their main shot, which is weak and can't deal constant concentrated damage.
There's no telling where Naraka will aim, and both Nirvana and the bomb have a really wide and unconcentrated attack range, lacking in attack methods with which to aim only a certain part.
For this reason, they'll have a hard time during the latter half of the game, where enemy health and placement becomes harsher.
However, invincibility helps a lot, so they're recommended to those that simply want to clear the game.
Minogame are actually turtles which have so much algae attached to their backs that it looks like they're wearing a mino ("mino" + "kame (turtle)" = minogame). They appear in many Japanese legends and are regarded as a symbol of longevity.
On another note, Sokushinbutsu is a term that refers to Buddhist monks that practice asceticism to the point of being mummified alive.
KAGURA is the 4th character, unlocked when beating Stage 4 (there are exceptions).
You can press Pause during Character Select to cycle through its equipment in order and choose one of them.
■KAGURA Chirijinmu
One of its strongest points is the ability to hold 2 bombs at once, so when your gauge is full you can use them both in a row.
If you choose ADEPT instead of SOLIDSTATE as the defense option,
you can shoot while having Supression on.
An orthodox ship which is like a Maiden without close-range attacks, getting less complicated to use.
Chirijinmu is written 散神無, and in Radio Zonde it was shown as ZYL-I-ZINM as well. The first character means "disperse", the second one means "god", and the third one means "nothingness/void/absence". This is not an actual word by itself, but there's an interesting interpretation:
In Radio Zonde, the boss with this name has a second phase where its name changes to a word that means "dust storm". This leads to a different interpretation of the reading of its first name, where instead of 散神無 it would become 塵塵無, another invented word that would mean "no dust" (as in, what comes before the "dust storm").
■KAGURA Gousetsu
It uses an invulnerable detachable option.
Recommended for fans of R-TYPE or Moon Cresta.
Naturally, it's all about fighting by utilizing this option.
It displays exceptional power and scoring when throwing the option into bosses' cores.
However, keep in mind that the main ship's attack and defense lower considerably when the option is detached.
Gousetsu is written as 劫殺, and also as GO-THEZ in Radio Zonde, its name possibly originating from a word with the same reading that refers to great snowfalls, which are generally damaging.
The first character generally represents a buddhist concept indicating an extremely long amount of time, basically the lifetime of an entire universe (it has other meanings such as "steal" and "threaten"); the second character means "kill".
■KAGURA Himawari
A ship with super-high firepower.
It's a simple ship with just 3 ways of attacking: main shot, charging sunflower, and bomb.
It displays terrifying damage when sticking close to enemies, something you might not be able to let go of once you've experienced it.
However, its movement is rather slow, and because it has poor defensive methods, it requires even more careful planning than DEAD LIAR.
A ship that is controlled more like that of a normal shmup, its attack being its greatest defense, and it feels natural to control.
Himawari is written as 緋輪, and it was also written as HIM-AWALY in Radio Zonde. The word "himawari" actually means sunflower, but in this case it's written with other characters not from the actual word. Instead, the first character is a hue of red (something like #D3381C from what I can find), while the second one means "ring/loop/wheel".
I suppose this is quite representative of its A-Hold attack, which are reddish circles that might look like sunflowers.
That being said, there's an alternative word in Japanese for sunflowers ("nichirinsou") which, similar to English, means "sun plant", so its name might also be a metaphor for the sun itself.
It could also be a reference to a series of Japanese weather satellites called "Himawari" (then again, this name is based on what was explained above).
■KAGURA Omiwatari
-Limited bullets on its main shot
-Can swing a sword
-Bomb at MAX gauge is super ultra powerful
The most out-of-the-norm of all 7 ships, ideal for fans of Radiant Silvergun.
The damage its weapons deal is not bad at all, but they're all hard to aim or hard to charge,
forcing you to think about how to link different moves together like combos in a fighting game.
Not knowing how to use it will end in tragedy, but if you manage to get into it it becomes extremely stylish. It requires a lot of cerebral play.
Omiwatari is written as 神弥, and also as OMI-WATALY in Radio Zonde. Although the reading doesn't completely match with how it's written, and the second character is changed, this still retains the meaning of "god's passing/crossing", which is what the word "omiwatari" means, and this is used to describe pressure ridges that form on the Suwa Lake, which were believed to be formed by a certain god crossing the lake (more info).
So, how was it?
Maybe in the end it's still hard to understand.
Feel free to contact me if there are parts you think could be improved.
At the start there might be a lot of things you can't understand,
but past Stage 5 you'll probably start thinking "wow this is actually super fun!".
I'd be glad if I helped you reach that level.
It'd be great if you could reach and clear the last stage all on your own.
Well then, we're done for today.
KEEP YOUR DIGNITY.
■Links Hellsinker Strategy Guide at the Shmups Forums (read at your own discretion, the latter sections might have spoilers!). Includes a lot of links such as scoreboards and storefronts where you can buy the game. Scoreboard (some things are in Japanese but it's easy to use nonetheless)
■Useful videos
WIP
2019/08/13 Finished English translation (twitter@730asd, 730#8471 on Discord)
2010/12/19 Small fixes
2008/12/22 Fixed details in character explanations
2008/06/21 Published
■□■
Copyright(C)2008
Quarter Iceshop / Himuro Tomoe / saNari
All rights reserved.
E-mail:iceshop@q-ice.com